
HyperText Markup Language (HTML) is not a programming language; rather, it is a markup language used to structure content in a web browser and provide basic functionality. You can think of HTML as the browser's wireframe, allowing for the attachment and display of various types of content, such as images, buttons, and text.
In Step 1, we'll start by creating a basic web page using HTML to display one of the calculator buttons. As we progress through the remaining steps, we'll build the rest of the calculator.
Step 1 - Lesson
Instructions
Create the index.html file
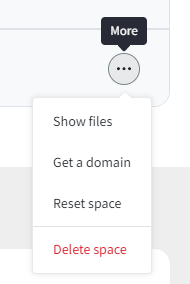
On the right side of the W3spaces page, expand the "More" menu and click "Show files".
After clicking "Show files," you will see a list of your existing files. This allows you to manage your project files easily as you build your calculator. Ensure that your files are organized for easier access later on.
-
In the table, locate the index.html row under the Name column, then click the Edit button on the far right.

-
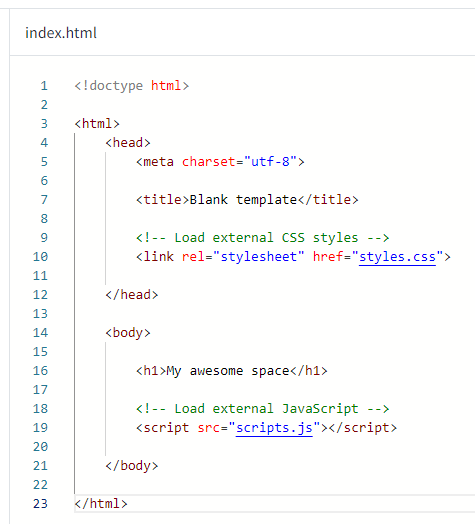
You should see the index.html file open and ready for editing.
-
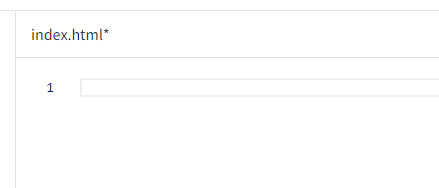
Select and delete all of the W3spaces default code in the file so that it is blank. We will replace this with our code.
-
Type the new code exactly as defined below. Accessibility users can access the full code as text in the "Step 1 Resources - HTML Markup in the index.html File" section at the bottom of this page.
-
Save your changes by clicking the Save button in the upper right corner, or by pressing
Ctrl + S.

-
Click the Run button in the upper right.

-
You should see a new window on the right displaying your button element.
-
Check that it looks and behaves like the button in the "Prototype" section below.
-
* If you want to learn more about this code or need help understanding it, see the "Step 1 Resources Explanation" section below.
Result
Step 1 - Resources
Explanation
-
<!DOCTYPE html>The doctype tag indicates that this document is intended to be interpreted as HTML.
Browsers can display various types of information. The doctype is used to define the type of information contained in the file. Since we are using HTML to render visual content in the browser window, we utilize the doctype tag to "inform" the browser so it can process the document correctly.
- For more information on doctypes, visit the W3Schools' HTML !DOCTYPE Declaration , opens in a new window
-
<html lang="en-US">-
XML - HTML is formatted in a structure called "eXtensible Markup Language," commonly referred to as "XML." XML is not a programming language; it is simply a way of structuring information. XML uses "tags" that begin with an opening '<' and a closing '>' character, such as
<html>. Tags are structured in opening and closing pairs, like<html>...</html>, and are called "nodes."
Everything in XML is structured within these nodes. The top-most node is called the Root Node, or simply the root. Since we are working with HTML, we name the Root Node "html," like
<html>...</html>. All remaining content will be contained inside the "html" node.- For more information on XML, visit W3Schools' XML Tutorial, opens in a new window
- For more information on nodes, visit W3Schools' XML DOM Nodes, opens in a new window
-
HTML Elements - In HTML, a "node" is referred to as an "element". An HTML element encompasses everything from its start tag to its end tag. An HTML element can contain other HTML elements, which are known as child elements. Web pages are defined using many different types of these HTML elements.
- For more information on styling HTML, visit W3Schools' HTML Style Guide, opens in a new window
- For more information on the HTML tag, visit W3Schools' HTML html Tag, opens in a new window
- For more information on HTML elements, visit W3Schools' HTML Elements, opens in a new window
-
HTML Attributes - Some tags have additional information contained within them after the tag name and before the closing '>'. These are referred to as HTML attributes. The term on the left side of the = sign is the attribute's name, while the terms on the right side of the = sign, which are enclosed in quotes, represent the attribute's value. This information is not displayed on the browser page; instead, it is used by the browser to determine how the content should be displayed, behave, and be experienced by users.
- For more information on HTML attributes, visit W3Schools' HTML Attributes, opens in a new window
-
The "lang" attribute informs the browser about the human language that will be presented to the user. For example, the language definition
lang="en-US"tells the browser that the content is intended for users who speak English in the United States.- For general information on the lang attribute, visit W3Schools' HTML lang Attribute, opens in a new window
- For detailed information on the lang attribute, visit W3Schools' Why Use the Language Attribute?, opens in a new window
- To see a list of all valid lang values, visit W3Schools' HTML Language Code Reference, opens in a new window
-
-
<head>The HTML
<head>tag is used for metadata. No information defined in the<head>tag will be displayed on a browser’s page.The
<head>element has one required child element called<title>.The
<head>element has six optional child elements. Follow the links below to W3Schools for more information:-
W3Schools' style, opens in a new window - used to define CSS styles within the file.
-
W3Schools' base, opens in a new window - specifies the base URL and/or target for all relative URLs in a document.
-
W3Schools' link, opens in a new window - most often used to link to external style sheets.
-
W3Schools' meta, opens in a new window - defines metadata about an HTML document. Metadata is data (information) about data.
-
W3Schools' script, opens in a new window - used to define JavaScript within the file.
-
W3Schools' noscript, opens in a new window - defines alternate content to be displayed to users who have disabled scripts in their browser or use a browser that does not support scripts.
-
For more information on the head tag, visit W3Schools' HTML head Tag, opens in a new window.
-
-
<meta http-equiv="Content-Type" content="text/html; charset=utf-8" />The meta content
charset=utf-8tells the browser how to interpret and display fonts and other characters.W3Schools' HTML meta http-equiv Attribute, opens in a new window
W3Schools' HTML Unicode (UTF-8) Reference, opens in a new window
W3Schools' See the codes at UTF-8 C0 Controls and Basic Latin, opens in a new window
-
<title>My Calculator</title>The HTML
<title>tag displays the title of the browser window. The<title>'s value for this page is: "".For more information on the title tag, visit W3Schools' title Tag, opens in a new window.
-
</head>This is the closing tag for the
<head>element, marking the end of all head definitions. -
<body>The HTML
<body>element contains all information displayed in the browser window.For more information on the body tag, visit W3Schools' HTML body Tag, opens in a new window.
-
<button type="button">Button Label</button>The
<button>element creates an HTML button. An HTML button is used to trigger events, such as submitting information to a server.There are two common ways to create an HTML button:
<input type="button" value="Button Label" />(the input tag cannot have child elements, so the button's label is defined with thevalueattribute)<button type="button">Button Label</button>(the button tag can have the child element "Button Label")
Note: When an HTML element cannot have a child element, like the
<input... />element, the tag is self-closing, using a space before/>instead of a separate closing tag.The button's
type="..."attribute informs the browser how the element should behave. There are three behavior types a button can have: button, submit, and reset.For more information on the button tag, visit W3Schools' HTML button Tag, opens in a new window.
For more information on the input tag, visit W3Schools' HTML input Tag, opens in a new window.
For more information on the type attribute, visit W3Schools' HTML button type Attribute, opens in a new window.
-
</body>This is the closing tag for the
<body>element, marking the end of all body definitions. -
</html>This is the closing tag for the
<html>element, marking the end of all HTML element definitions and, thus, the document.
HTML Markup in the index.html File
Hint: For the remainder of this course, this section will display the correct HTML code for each step. Below is the correct HTML code for "Step 1 HTML".
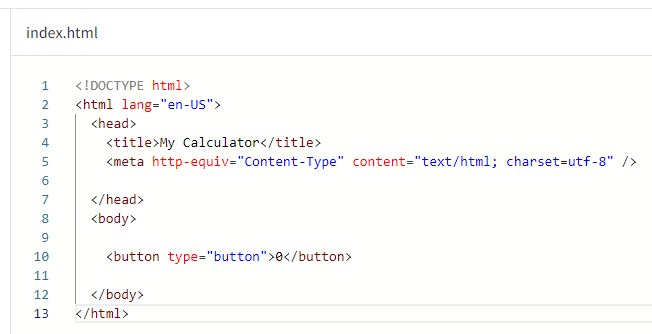
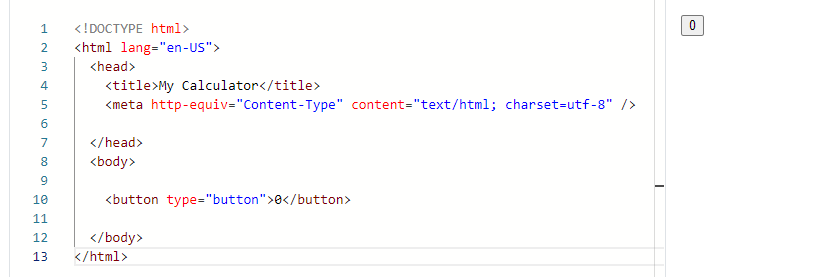
The HTML markup in your index.html file should match the sample below:
					<!DOCTYPE html>

					<html lang="en-US">

					  <head>

					    <title>My Calculator</title>

					    <meta http-equiv="Content-Type" content="text/html; charset=utf-8" />


					  </head>

					  <body>


					    <button type="button">0</button>


					  </body>

					</html>